In the digital age, the ability to change your location on your iPhone can unlock a world of possibilities, from accessing geo-restricted content to enhancing your privacy. This guide will provide a comprehensive overview of how to change your iPhone’s location, exploring the steps involved, the benefits it can bring, and the potential issues to be aware of. Whether you’re a seasoned tech enthusiast or a beginner, this guide aims to equip you with the knowledge on how to change location on iphone with ease and confidence.
How to change location on iPhone?
Changing the location on an iPhone can be done through various methods, each with its own set of steps and considerations. It’s crucial to be aware that changing your location may have consequences, and some services actively combat location spoofing due to privacy and security concerns. Additionally, users should ensure they have the legal right to modify their location and be mindful of potential violations of terms of service for certain apps and services.
Here’s a detailed explanation of different ways to change your location on an iPhone:
Using Location Services:
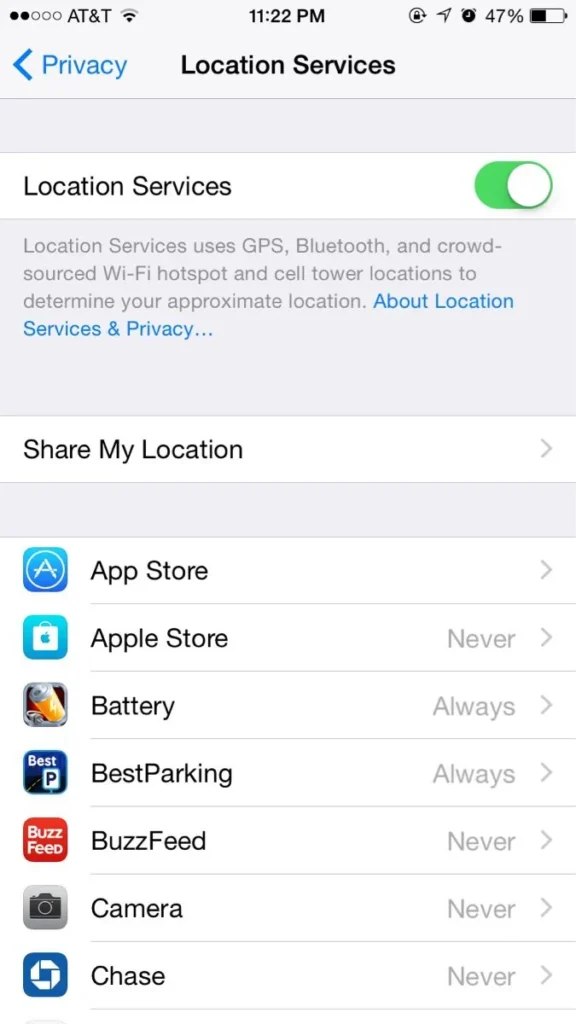
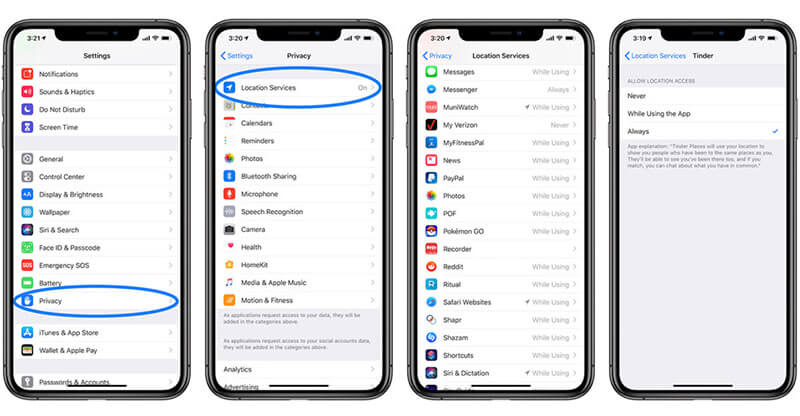
One of the fundamental methods to manage location settings on your iPhone is through the built-in Location Services. To access this:
- Go to “Settings” on your iPhone.
- Scroll down and select “Privacy.”
- Tap on “Location Services” to toggle it on.
- Scroll down to find the app for which you want to change the location and select it.
- Choose between “Never,” “Ask Next Time,” or “While Using the App” to customize the location setting for that specific app.
Using a VPN (Virtual Private Network):
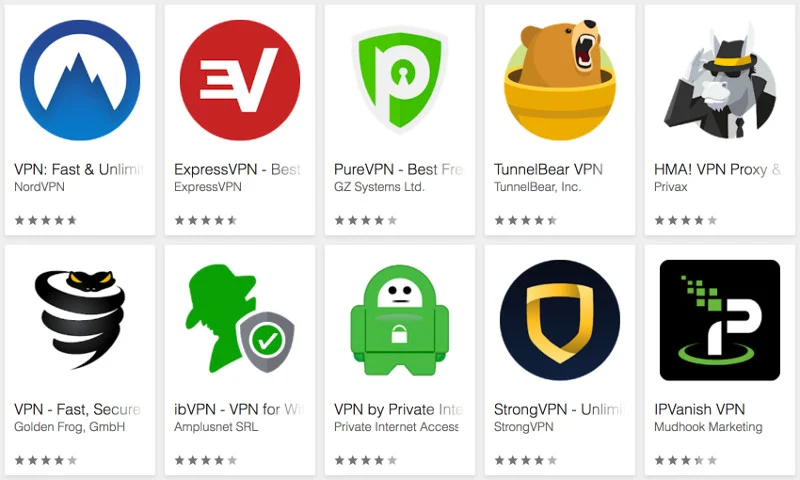
Virtual Private Networks, or VPNs, can alter your device’s IP address and provide a virtual location. Begin by downloading a reputable VPN app from the App Store.
- Download and install a reputable VPN app from the App Store.
- Open the VPN app and follow the instructions to set up your VPN connection.
- Connect to a server located in the desired region or country.
- Once connected, your iPhone’s IP address will appear as if it’s from the selected location.
Using a Location Spoofing App:
Location spoofing apps allow you to manually set your iPhone’s GPS coordinates, giving the illusion of a different location. Download a location spoofing app from the App Store, grant it the necessary permissions, and input the desired latitude and longitude coordinates or select a location on the app’s map interface. Once activated, the app will override the actual GPS location.
Using iTools (for Simulating Movement):
iTools is a desktop software that enables users to simulate movement on their iPhone. Begin by downloading and installing iTools on your computer.
- Download and install iTools on your computer.
- Connect your iPhone to the computer using a USB cable.
- Open iTools and select the “Toolbox” option.
- Click on the “Virtual Location” feature.
- Enter the desired location coordinates or use the map interface to simulate movement.
Changing Apple ID Region:
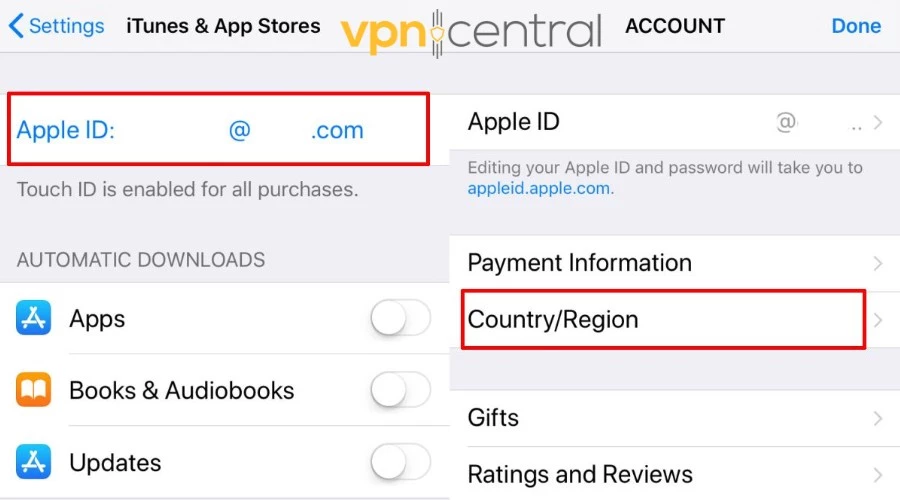
Altering your Apple ID region can affect the content available on the App Store and iTunes for that specific location.
- Go to “Settings” on your iPhone and tap on your name at the top.
- Select “iTunes & App Store.”
- Tap on your Apple ID and choose “View Apple ID.”
- Authenticate with your password or Face ID/Touch ID.
- Tap on “Country/Region” and select the desired country.
Using Location-Based Apps:
Some apps, particularly those with location-dependent features like dating or social media apps, allow users to manually set their location within the app settings. Open the app, navigate to its settings or profile section, and look for a “Location” or “Geolocation” option. Enter the desired location to influence the app’s location-based features.
How to change your Apple Store region on iPhone or iPad
Changing your Apple Store region on your iPhone or iPad involves adjusting your Apple ID settings. Here’s a step-by-step guide on how to do this:
1. Open Settings:
Begin by unlocking your iPhone or iPad and navigating to the “Settings” app. This is typically represented by a gear icon on your home screen.
2. Tap on Your Apple ID:
Within the Settings menu, locate and tap on your Apple ID, which is usually at the top of the screen. This will open a new menu with various options related to your Apple ID.
3. Choose “Media & Purchases”:
In the Apple ID menu, select “Media & Purchases.” If you’re using an iPad, you might find this option named as “iTunes & App Store.”
4. Tap on “View Account”:
Next, tap on “View Account.” You may need to sign in with your Apple ID password or use Touch ID/Face ID to authenticate.
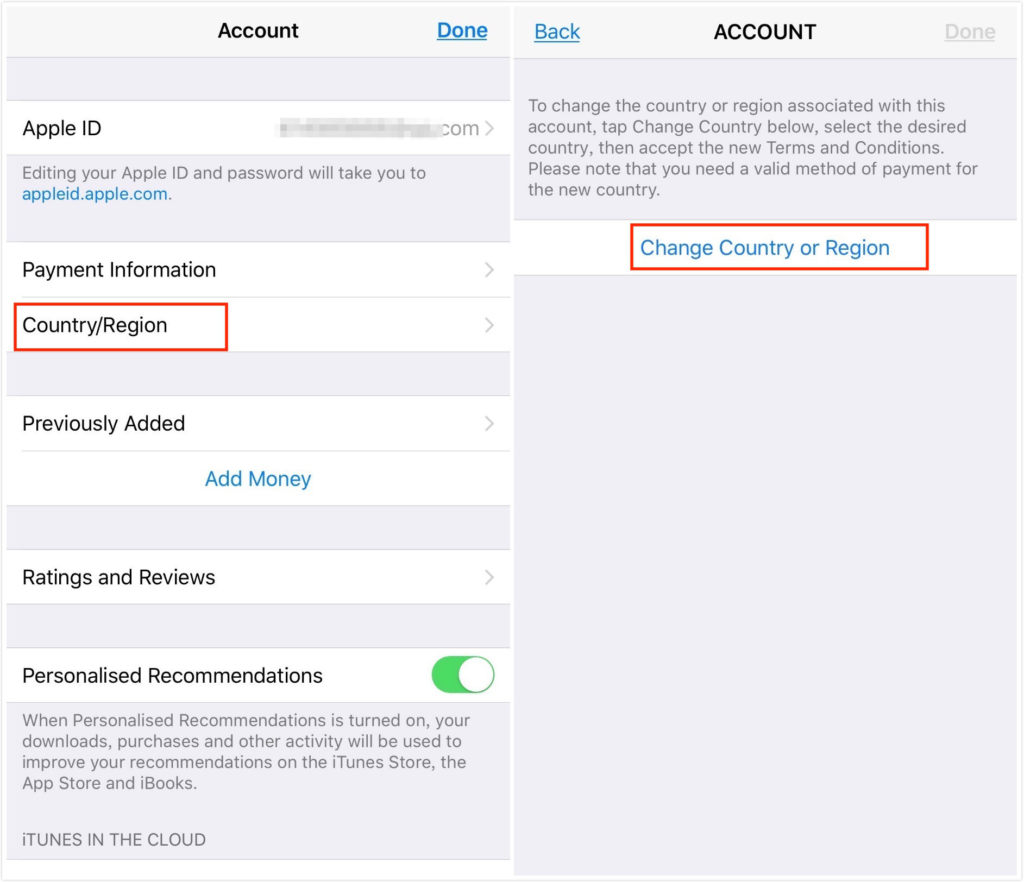
5. Tap on “Country/Region”:
Once you are viewing your account details, locate and tap on “Country/Region.” This option is usually found under your Apple ID summary.
6. Tap “Change Country or Region”:
In the Country/Region section, you’ll find an option to “Change Country or Region.” Tap on this to proceed with updating your Apple Store region.
7. Select the New Region:
A list of countries and regions will appear. Choose the new region you want to set for your Apple Store. Keep in mind that you may need to review and agree to new terms and conditions specific to the selected region.
8. Enter a Valid Payment Method:
Apple may require you to provide a valid payment method for the new region. This could be a credit card or other accepted payment methods for the selected country. If you don’t have a payment method for the new region, you may need to add one.
9. Update Billing Address:
Enter a valid billing address for the new region. This address should match the country you selected. You may need to provide accurate details to successfully change your Apple Store region.
10. Complete the Process:
Follow the on-screen prompts to complete the process. This may include reviewing and accepting new terms and conditions. Once done, your Apple Store region will be updated.
How can I reset my location on iPhone?
Resetting your location on an iPhone involves various methods, depending on the context and the purpose. By following these steps, you can reset your iPhone’s location settings and address any issues related to location accuracy or tracking. Choose the method that aligns with your specific needs, whether it’s a comprehensive reset or adjustments to specific apps or services
Here’s how to reset your location on iPhone:
Turn Off Location Services:
- Open “Settings” on your iPhone.
- Scroll down and select “Privacy.”
- Tap on “Location Services” to toggle it off. This will disable location tracking for all apps.
Reset Location & Privacy Settings:
- Navigate to “Settings” and select “General.”
- Scroll down and tap on “Reset.”
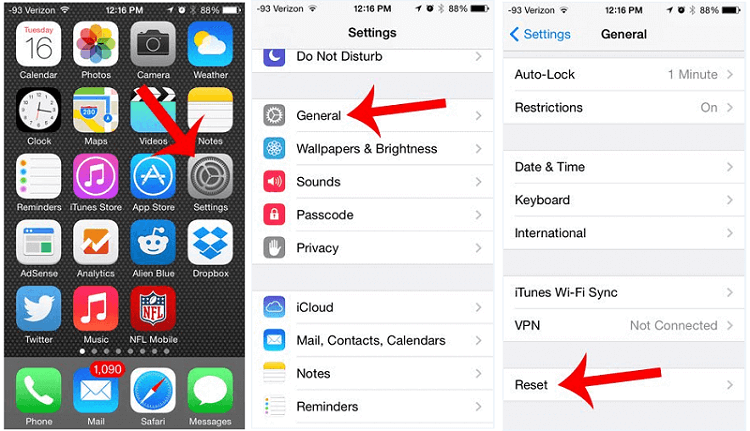
- Choose “Reset Location & Privacy.” This action resets location settings for all apps and services, prompting them to request permission again when accessed.
Toggle Airplane Mode:
- Open Control Center by swiping down from the top-right corner (or up from the bottom, depending on your iPhone model).
- Enable Airplane Mode by tapping on the airplane icon. This disables all wireless connections, including GPS.
- After a few seconds, disable Airplane Mode to re-enable wireless connections.
Restart Your iPhone:
- Restarting your iPhone can sometimes resolve location-related issues.
- Power off your iPhone, wait a few seconds, and then power it back on.
Reset Network Settings:
- Go to “Settings” and select “General.”
- Scroll down and tap on “Reset.”
- Choose “Reset Network Settings.” This action resets Wi-Fi, cellular, and VPN settings, which can impact location services.
Disable Location for Specific Apps:
- If you want to reset location for a specific app, go to “Settings.”
- Scroll down and select the app.
- Toggle off the “Location Services” switch for that app.
Clear Location History:
- Open “Settings” and tap on “Privacy.”
- Select “Location Services” and choose “System Services.”
- Tap on “Significant Locations” to view and clear your location history.
Restore Location & Privacy Settings to Default:
- In “Settings,” go to “General” and then “Reset.”
- Choose “Reset Location & Privacy Settings to Default.” This resets all location and privacy settings to their factory defaults.
Check Time and Date Settings:
- Incorrect time and date settings can affect location accuracy.
- Go to “Settings,” select “General,” and tap on “Date & Time.” Ensure that “Set Automatically” is enabled.
Update iOS:
- Ensure that your iPhone is running the latest iOS version.
- Go to “Settings,” select “General,” and tap on “Software Update.”
Benefits of changing your iPhone’s location
Changing your iPhone’s location can have several benefits, depending on your needs. Here are some of the potential benefits and a step-by-step guide on how to change your iPhone’s location:
- Access to Geo-Restricted Content: Some apps and services offer content that is only available in certain geographical locations. By changing your iPhone’s location, you can access this geo-restricted content.
- Privacy: If you’re concerned about your privacy, changing your iPhone’s location can help. It prevents apps and services from knowing your exact location, which can be beneficial if you want to keep your whereabouts private.
- Testing and Development: If you’re an app developer, changing your iPhone’s location can be useful for testing. You can check how your app behaves in different locations without having to physically travel.
- Bypassing Censorship: In some regions, certain online content or services may be censored or blocked. Changing your iPhone’s location can allow you to bypass these restrictions and access the content or services.
Also Read: “How to Stop Sharing Location Without Them Knowing“
Conclusion
Changing the location on your iPhone can be a powerful tool for accessing geo-restricted content, ensuring privacy, testing apps, and bypassing censorship. However, it’s important to use this feature responsibly to avoid potential legal issues or violations of service terms. Always remember to check the specific laws in your jurisdiction and the terms of service of the apps you’re using. With careful use, the ability to change your iPhone’s location can greatly enhance your user experience and open up new possibilities.
FAQ
- Is it legal to change your location on an iPhone?
Changing your location on an iPhone is generally not illegal for personal use, such as maintaining privacy. However, using a fake location to deceive others, commit fraud, or violate the terms of service of an app could potentially be illegal or result in penalties from the service provider. Laws vary by jurisdiction, so it’s important to understand your local laws.
- Will changing my Apple ID region affect anything?
Yes, changing your Apple ID region can affect several things. It can change the availability of certain apps and media in the App Store and iTunes Store. It can also affect your iCloud services, subscriptions, and payment methods. It’s recommended to check Apple’s guidelines before making such changes.

![How to Pause Location on Find My iPhone Without Them Knowing? [2024] 28 how to pause location on find my iphone](https://izood.net/wp-content/uploads/2024/10/How-to-Pause-Location-on-Find-My-iPhone-Without-Them-Knowing-400x300.png)
![How To Inspect Element on iPhone [4 Methods] 31 how to inspect element on iphone](https://izood.net/wp-content/uploads/2024/10/how-to-inspect-element-on-iphone-3-400x300.png)
