


Accepting a shared album invite on your iPhone is a simple process that allows you to view and contribute to a collection of photos and videos shared by someone else. This feature, available through Apple’s Photos app, is a great way to share memories with family and friends. Whether it’s for a special event, like a wedding or a vacation, or just everyday moments, shared albums let you collaborate and keep all your favorite photos in one place. In this guide, we’ll walk you through the steps to accept a shared album invite, so you can start enjoying and adding to your shared album.
How to accept shared album invite?
Shared albums let you collaborate and keep all your favorite photos in one place. In the following steps, we’ll guide you on how to accept a shared album invite, enabling you to start enjoying and contributing to your shared album.
On iPhone
to receive shared album invites, you need to have the Shared Albums feature enabled on your iPhone. You can check this by going to the Settings app, tapping on ‘Photos’, and ensuring the toggle next to ‘Shared Albums’ is turned on.
Here’s how you can accept a shared album invite on your iPhone:
- Check your Notifications: You might have received a notification about the shared album invite. If you see this notification, tap on it.
- Open the Photos app: If you didn’t receive a notification or if you’ve cleared it, you can open the Photos app on your iPhone.
- Go to the ‘For You’ section: At the bottom of the screen, you’ll see a ‘For You’ icon. Tap on it. Here, you’ll find a section for Shared Album Activity, which includes any pending invitations.


- Accept the Invitation: In the Shared Album Activity section, look for the album invite you want to accept. There should be a blue ‘Accept’ button next to it. Tap on this button to join the shared album.
- View the Album: After accepting the invitation, you can tap on the album to view it.
- Find the Album in the ‘Albums’ tab: If you can’t find the shared album after accepting the invite, go to the ‘Albums’ tab in the Photos app. Under the ‘Shared Albums’ section, you should be able to see all the shared albums you’ve joined.
On your Mac/PC
Here’s how you can accept a shared album invite on your Mac or PC. Remember, to receive shared album invites, you need to have the Shared Albums feature enabled on your iCloud account. You can check this by going to the iCloud settings on your Mac or PC.
- Open your Email: Shared album invites are usually sent via email to the Apple ID associated with your iCloud account. Check your inbox for an email from iCloud Photo Sharing.
- Find the Invitation: Look for an email with the subject line “Invitation to view shared album”. This email contains the invitation to the shared album.
- Accept the Invitation: In the email, you’ll see an “Accept” button. Click on this button to accept the invitation and view the shared album.
- Open Photos app: After accepting the invitation, the shared album should be available in the Photos app on your Mac. If you’re on a PC, you’ll need to access the shared album through the iCloud website.
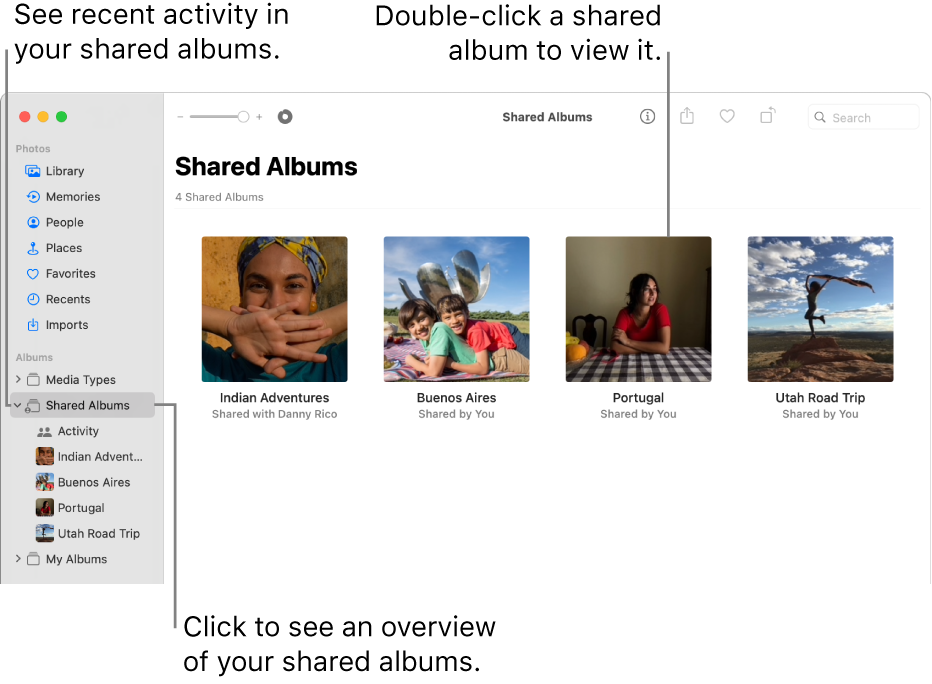
- Go to Shared Albums: In the Photos app or on the iCloud website, go to the “Shared Albums” section. Here, you’ll find all the shared albums you’ve joined.

How do I find a shared album on my iPhone?
As said earlier, even for finding a shared album you should enable the shared albums feature. You can check this by going to the Settings app, tapping on ‘Photos’, and ensuring the toggle next to ‘Shared Albums’ is turned on.
- Open the Photos app: Tap on the Photos app icon on your iPhone’s home screen to open it.
- Go to the Albums tab: At the bottom of the screen, you’ll see several tabs. Tap on the ‘Albums’ tab.
- Find the Shared Albums section: Scroll down in the Albums tab until you see the ‘Shared Albums’ section. This section contains all the shared albums you’ve joined.
- Open the Shared Album: Tap on the shared album you want to view. This will open the album and you can see all the photos and videos that have been shared in it.
How to Leave a Shared Photo Album on iPhone?
Here’s how you can leave a shared photo album on your iPhone:
- Open the Photos app: Tap on the Photos app icon on your iPhone’s home screen to open it.
- Go to the Albums tab: At the bottom of the screen, you’ll see several tabs. Tap on the ‘Albums’ tab.
- Find the Shared Albums section: Scroll down in the Albums tab until you see the ‘Shared Albums’ section. This section contains all the shared albums you’ve joined.
- Open the Shared Album: Tap on the shared album you want to leave. This will open the album.
- Tap on the ‘People’ tab: At the bottom of the screen, you’ll see a ‘People’ tab. Tap on it.
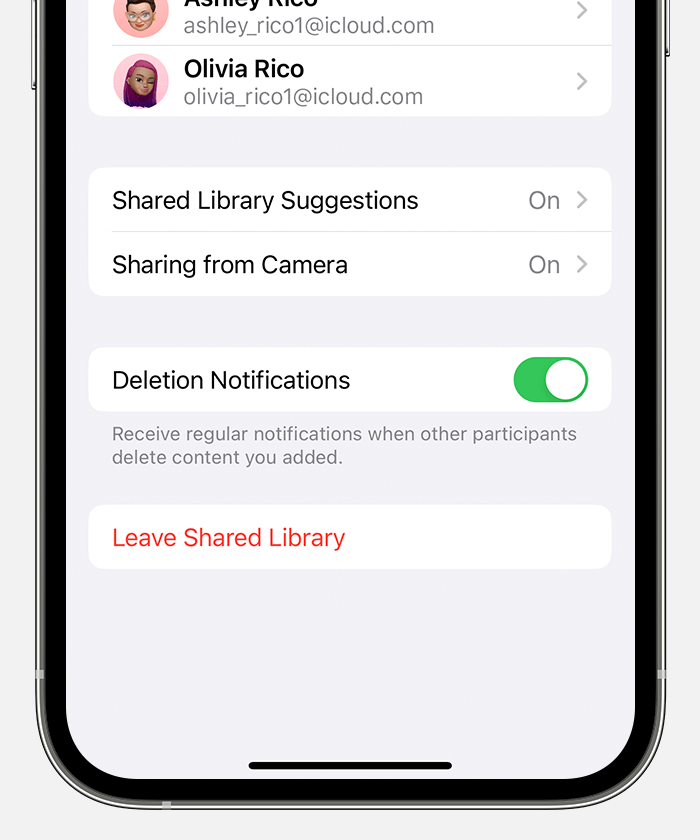
- Leave the Shared Album: At the bottom of the ‘People’ tab, you’ll see a red ‘Leave Shared Album’ button. Tap on it. A confirmation message will pop up, asking if you’re sure you want to leave the shared album. Tap ‘Leave’ to confirm.

Remember, once you leave a shared album, you won’t be able to view the photos and videos in it unless you’re invited again and accept the invitation.
Shared Album Invite Not Showing Up
If a shared album invite is not showing up on your iPhone, there could be several reasons for this. Here are some steps you can take to troubleshoot the issue:
- Check your internet connection: Make sure your iPhone is connected to the internet. Shared album invites are sent via iCloud, which requires an internet connection to work.
- Check your iCloud settings: Go to the Settings app on your iPhone, tap on your name at the top, then tap on ‘iCloud’. Make sure ‘Photos’ is turned on and the ‘Shared Albums’ feature is enabled.
- Check your Notifications: The invite might have been sent as a notification. Check your Notification Center to see if you missed it.
- Check your email: Shared album invites are also sent to the email associated with your Apple ID. Check your email inbox and spam folder for an invite.
- Ask the sender to resend the invite: There might have been an issue with the invite. Ask the person who created the shared album to cancel and resend the invite.
- Restart your iPhone: Sometimes, a simple restart can solve many issues. Press and hold the power button and slide to power off. After your iPhone turns off, press and hold the power button again until you see the Apple logo.
Remember, shared albums are part of iCloud, so make sure you’re signed in to iCloud with the same Apple ID you use for Shared Albums.
Also Read: “How to Create a Folder on iPhone?”
Conclusion
Accepting a shared album invite on your iPhone is a simple yet powerful way to connect with others and share experiences. By following the steps outlined, you can easily join a shared album and start viewing and contributing to a shared collection of photos and videos. Whether it’s a special event or everyday moments, shared albums bring us closer together. Remember to check your notifications and the Photos app for invites, and ensure that the Shared Albums feature is enabled in your settings. Happy sharing!
FAQ
- Why can’t I share an album?
If you’re unable to share an album, there could be several reasons for this. Here are some potential issues and solutions:
- Internet Connection: Ensure that your device is connected to the internet. Sharing an album requires an active internet connection.
- iCloud Settings: Check your iCloud settings. Go to the Settings app on your device, tap on your name at the top, then tap on ‘iCloud’. Make sure ‘Photos’ is turned on and the ‘Shared Albums’ feature is enabled.
- Storage Space: Check if you have enough storage space in iCloud. Shared albums use your iCloud storage, and if it’s full, you might not be able to share an album.
- Software Update: Make sure your device’s software is up to date. Sometimes, sharing issues can occur if you’re using an outdated version of the operating system.
- Sign Out and Sign In to iCloud: Try signing out of iCloud and then signing back in. This can sometimes resolve issues with iCloud services.
- Restart Your Device: If all else fails, try restarting your device. This can often fix temporary issues
- How do I delete a shared album on iPhone?
- Open the Photos app: Tap on the Photos app icon on your iPhone’s home screen to open it.
- Go to the Albums tab: At the bottom of the screen, you’ll see several tabs. Tap on the ‘Albums’ tab.
- Find the Shared Albums section: Scroll down in the Albums tab until you see the ‘Shared Albums’ section. This section contains all the shared albums you’ve joined or created.
- Open the Shared Album: Tap on the shared album you want to delete. This will open the album.
- Tap on the ‘People’ tab: At the bottom of the screen, you’ll see a ‘People’ tab. Tap on it.
- Delete the Shared Album: At the bottom of the ‘People’ tab, you’ll see a red ‘Delete Shared Album’ button. Tap on it. A confirmation message will pop up, asking if you’re sure you want to delete the shared album. Tap ‘Delete’ to confirm.
- How can I save photos from the shared album on my iPhone?
- Open the Photos app: Tap on the Photos app icon on your iPhone’s home screen to open it.
- Go to the Albums tab: At the bottom of the screen, you’ll see several tabs. Tap on the ‘Albums’ tab.
- Find the Shared Albums section: Scroll down in the Albums tab until you see the ‘Shared Albums’ section. This section contains all the shared albums you’ve joined.
- Open the Shared Album: Tap on the shared album from which you want to save photos. This will open the album.
- Select the Photo: Find the photo you want to save and tap on it to open it.
- Tap on the Share icon: At the bottom left corner of the screen, you’ll see a Share icon. Tap on it.
- Save the Photo: In the share menu that appears, scroll down and tap on ‘Save Image’. The photo will be saved to your iPhone’s Camera Roll.
Remember, the saved photo will be a copy of the original photo from the shared album. Any changes you make to the saved photo will not affect the original photo in the shared album.