

In the rapidly changing world of technology, it’s important to make sure that your drivers are always up to date. But changing your Nvidia drivers can sometimes make your computer less stable or not work with other programs. In this case, going back to an earlier version of the driver can save the day. This complete guide will show you How to roll back Nvidia drivers on both Windows 11 and Windows 10.
Why We Roll Back Nvidia Drivers?
Before we jump into the rollback process, let’s understand why rolling back Nvidia drivers can be necessary. Here are a few common scenarios where rolling back drivers can be beneficial:
- Compatibility Issues: After updating your Nvidia drivers, you may experience compatibility issues with certain applications or games. Rolling back to a previous version can help resolve these compatibility conflicts.
- Stability Problems: New driver updates may introduce stability issues, such as system crashes or freezes. Rolling back to a more stable driver version can help restore the smooth operation of your system.
- Performance Degradation: In some cases, a driver update may negatively impact the performance of your Nvidia GPU. Rolling back to a previous version can help regain the optimal performance you were experiencing before the update.
- Known Issues: Nvidia driver updates sometimes come with known issues or bugs. If you encounter any of these known issues after updating, rolling back to a previous version can provide a temporary solution until the issues are resolved.
How to Roll Back Nvidia Drivers?
First of all, there are some things you need to do before proceeding with any driver-related actions.
Checks Before Everything
- Create a Restore Point: Before making any changes to your Nvidia drivers, create a restore point to have a backup of your system’s current state. This will allow you to revert back to the exact configuration if anything goes wrong during the rollback process.
- Restart Your Computer: Restarting your computer before rolling back Nvidia drivers helps ensure that all system processes are refreshed and no applications or services are actively using the GPU.
- Back Up Important Data: It is always a good practice to back up your important data before making any changes to your system. Although rolling back drivers should not cause data loss, it is better to be safe than sorry.
After doing these preliminary checks in place, let’s go to the process of rolling back Nvidia drivers on Windows 11 and Windows 10.
How to Roll Back Nvidia Drivers in Windows 11?
In Windows 11, it only takes a few easy steps to roll back Nvidia drivers. The Device Manager can be used as one way to do it.
Using Device Manager
The Device Manager utility in Windows 11 allows you to manage and update your system’s hardware drivers. To roll back Nvidia drivers using Device Manager, follow these steps:
- Press the Windows key + X on your keyboard to open the Power User Menu. From the menu, select “Device Manager” to open the Device Manager window.
- To access the “Display Adapters” section of the Device Manager, open the window.
- Pick “Properties” from the context menu when you right-click on your Nvidia graphics card.

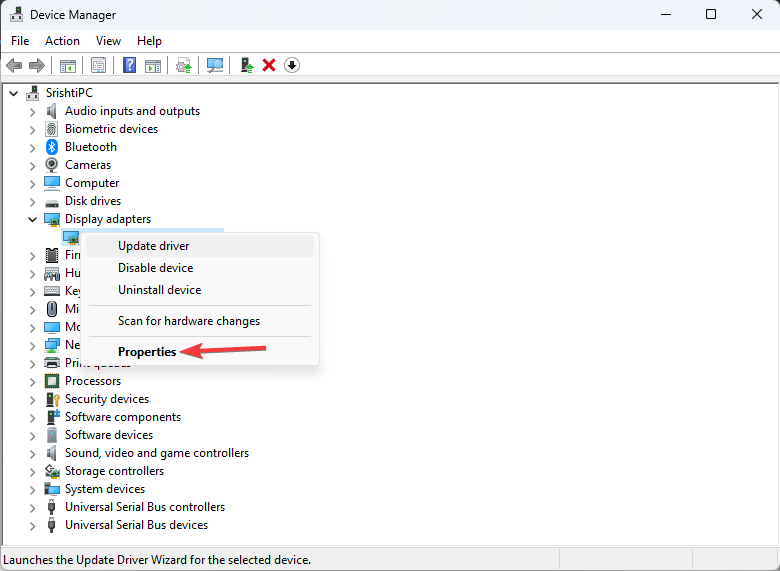
- Just go to the “Driver” tab in the Properties window.
- Click on the “Roll Back Driver” button. There is no longer a way to revert to an earlier driver version if the button is grayed out.
- A confirmation prompt will appear asking for the reason for the rollback. Select an appropriate reason and click “Yes” to proceed.
- Windows will now uninstall the current Nvidia driver and reinstall the previous version. The process may take a few moments.
- Once the rollback is complete, restart your computer to apply the changes.
If the Roll Back Driver Option is Greyed Out
If the “Roll Back Driver” option is grayed out in Device Manager, it means that Windows cannot find a previous version of the Nvidia driver to roll back to. In such cases, you will need to manually download and install the older version of the Nvidia driver.
Using Display Driver Uninstaller (DDU)
If the roll back options mentioned above do not work or the button is grayed out, you can use the Display Driver Uninstaller (DDU) utility to completely uninstall the current Nvidia driver and perform a clean installation of the older version. Here’s how you can use DDU:
- Visit the official website of Display Driver Uninstaller and download the latest version of the utility.
- Save the ZIP file to your PC and then extract its contents.
- Restart your computer and boot into Safe Mode. To do this, open the Start menu, hold the Shift key, and click on the Power button. Select “Restart” while holding the Shift key.

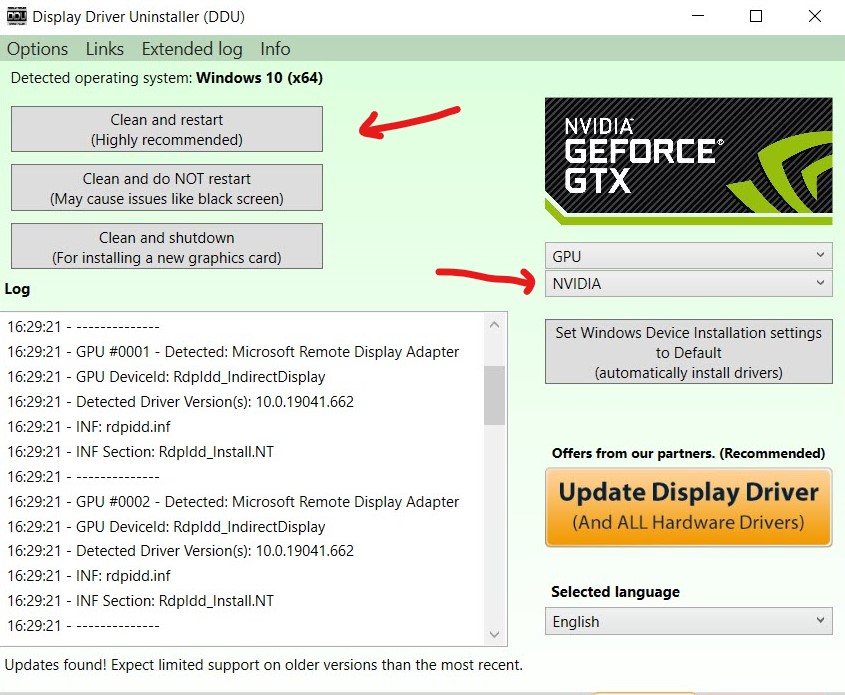
- Once your computer restarts in Safe Mode, open the extracted DDU folder and run the DDU executable file.
- In the DDU application, select the GPU and Nvidia options from the respective dropdown menus.
- Click on the “Clean and restart” button to initiate the driver uninstallation process.
- DDU will remove all traces of the current Nvidia driver from your system and automatically restart your computer.
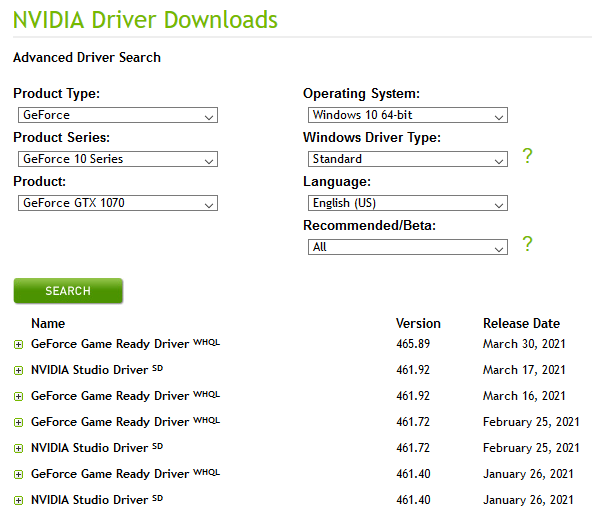
- After the restart, visit the Nvidia drivers website and download the older version of the Nvidia driver that you want to install.

- Launch the driver installer that you downloaded, and then follow the on-screen prompts to finish the installation.
- Restart your computer once again to apply the changes.
Now let’s look at how to roll back Nvidia drivers on Windows 10.
How to Roll Back Nvidia Drivers in Windows 10
Since the procedure of rolling back Nvidia drivers on Windows 10 is similar to that of Windows 11, we do not wish to repeat the same things that have been done previously. You can use the information that you learned about Windows 11 to Windows 10 if you have read the instructions that was written about Windows 11.
Extra Advice and Things to Think About
Always download drivers from official sources, such as the Nvidia website, to ensure you are getting the genuine and most up-to-date drivers.
You should set a system restart point before you change your drivers. In case something goes wrong during the return process, this lets you go back to the previous state. Update your drivers so that you can use the newest features, get rid of bugs, and get better speed. If you have any problems after changing, though, don’t be afraid to go back to an earlier version.
To keep your system going smoothly and efficiently, check for driver updates on a regular basis. This includes Nvidia drivers. If you’re not sure which version of the driver to go back to, you could ask Nvidia support or look for help on online sites.
Also Read: How to Turn on Bluetooth on Windows 10 and 11 (Full Guide)
In Closing
If you’re having trouble with compatibility, stability, or speed after updating your Nvidia drivers, rolling them back might help. This complete guide shows you how to roll back Nvidia drivers on both Windows 11 and Windows 10. Before you do anything related to drivers, make sure you do some preliminary checks, like making a restore point and backing up important data. By taking these steps, you can make sure that the rollback process goes smoothly and without any problems.